Sunday, October 21, 2018

Series 8 - Build Windows 2017 clusters with built-in shared storage

In Series 2, we talked about providing clusters with shared storage via StarWind Virtual SAN. If you want to explore an alternative way for shared storage i'm going to show you one in this post - That is, leveraging Windows Server built-in "iSCSI Target Server" feature. Before we start, let's get familiar with a few terms -

iSCSI - It stands for "Internet Small Computer System Interface". An industry standard protocol allowing sharing block storage over the Ethernet.

iSCSI Target - An object allowing iSCSI initiator to establish a connection.

iSCSI Initiator - Usually an application server that consumes iSCSI shared storage

iSCSI virtual disk - An vhd file that can be mounted as shared disk by iSCSI initiator


Here are the steps to create three node windows cluster using this feature.

Step 1. Enable iSCSI target

In Server Manager, choose "Add roles and features" -> Role-based installation ->  Next to select HPV-HOST from server pool -> Check "File and Storage Services" -> Check "File and iSCSI Services" -> Check iSCSI Target Server -> Restart vm host to complete the feature installation.


Step 2. Configure iSCSI target Server

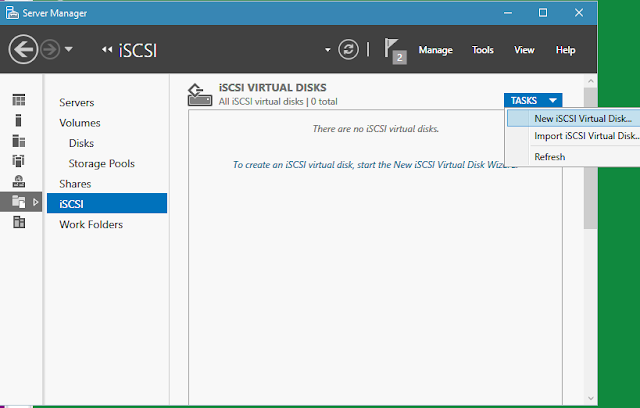
On HPV-HOST, launch Server Manager -> choose "File and Storage Services" -> iSCSI -> Under "TASKS" choose New iSCSI Virtual Disk 


Then pick whatever disk drive we'd like to share storage.


Give it a name and optional description.


Specify size and type of disks. We prefer Dynamic disks as we can always expand it if needed. Starting size is 30 GB


Choose New iSCSI target.


Name it as the vm host name "HPV-HOST".


Repeat above steps for E:, F: drives. Just use Existing iSCSI target which is already created for Mars.


In Access Servers pane, click Add to add Mars from initiator cache on the target server


Repeat the above steps for Jupiter and Saturn who will be two more nodes in the cluster.


Click Next button to enable authentication. Leave "Enable CHAP" and "Enable reverse CHAP" as is. Review summary page.


Click on "Create" button to create iSCSI disks. 


Step 3. Configure iSCSI initiators on cluster nodes

On Mars, go to Admin Tools -> iSCSI Initiator. Type in "HPV-HOST" in the Target box. Click Quick Connection button. If connection is successful you'll see the name and connected status. 


Repeat these steps to establish connections to the target from nodes Jupiter and Saturn.

Step 3. Configure iSCSI disks on cluster nodes

On Mars, Jupiter and Saturn you should see the following screenshot in Disk Manager. Notice the iSCSI shared disks all are shown as "Offline" and "Unknown"


Right click a disk and choose "Online". Notice the disk is now changed from "Offline" to "Not initialized". 


Richt click on the disk again and choose "Initialize Disk". 


Take default in disk initialization. After clicking OK, the disk shows up as "Basic" and "Online".


Notice the status difference among the three disks 


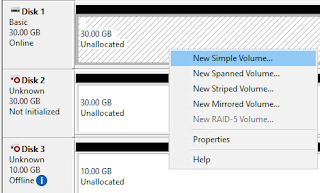
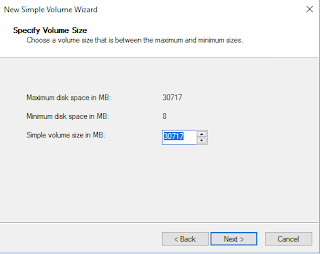
Right click on the disk and choose "New Simple Volume". Give it a size. 


Next assign a drive letter to the new disk. We call it X for data as D: is being used by CD-ROM


Click on Next to format the drive. Label it as "Data" and use 64KB for allocation unit size.


When format is complete, the disk drive X shows up in Windows Explorer and Disk Manager.


Repeat the above steps for log, tempdb, quorum and MSDTC drives. After all disk drives have been formatted successfully, they should look like the diagram below:


Step 4. Verify iSCSI disks on cluster nodes via Validation. We choose all tests including shared disk storage and the result is success. 


Saturday, October 20, 2018

Series 7 - How to Clone Jupiter from Mars

No, That's not what you're thinking. No celestial bodies here.

It's my personal adoption of astronomical nomenclature when naming lab computers. When building clusters i hate to go through OS installation and update patches on each node. So making a vm template is very useful. In this post I'll elaborate on how to create a vm template called "Mars" and make clone vms out of it - Jupiter, Saturn, and so forth.

Step 1. Prepare Mars as a template

1. Prep source vm server:
On Windows 2016 server Mars, prepare all stuff that needs to be replicated on other clones -
(a) Activate Windows
(b) Install Windows updates to current
(c) Install cluster service
(d) Start Microsoft iSCSI Initiator Service
(e)  Ensure two NICs exist, one for public and one for private. If you use iSCSI for storage connection you'll need three NICs
(f) Configure IE
(g) Enable remote desktop access

2. Strip SID:
Because no two identical machines can coexist on the same network at the same time, cloned vm and its source template vm must be striped of computer name, domain membership, IP address, etc. There is a Windows built-in program called SysPrep.exe we can use to make sure the internal security identifier does not duplicate. Launch the utility from Mars' C:\Windows\System32\Sysprep. Choose shutdown option to make sure the machine is off when strip operation is completed.


3. In Hyper-V Manager right click Mars and choose "Export". The vm can be in off or running state.


4. Specify the location to store the template then hit Export button. We leave it on the Hyper-V host


5. Minutes later check the file system to verify the completed template.


Step 2. Cloning of Jupiter

1. In Hyper-V Manager click on Actions "Import Virtual Machine...":


2. Choose where Mars template is stored. Note: choose the virtual machine folder


3. Click Next to confirm the source file to import.


4. Next we will select new SID.


5. Next choose the clone destination for Jupiter. 


6. As well as for the vhd file location.


7. Review the summary  and click finish.


Step 3. Cleanup

1. Upon completion of cloning we end up with two identical vms. Which one is the source and which one is the clone? Let's check vm settings to distinguish them by comparing hard disk path.


2. Click on Browse button to go to Mars.vhdx under Jupiter folder and rename it to Jupiter. Click Apply then OK. While the cloned Mars is still in highlight in Hyper-V Manager, rename it to Jupiter.

3. Start Mars and Jupiter from Hyper-V Manager. Login in console as Administrator. Both vms will go through a brief startup processes. Click on Next and Accept license terms.


4. Upon login in to Windows, compare the following items:
- Windows will take a little while to get activated
- Computer names are no longer retained (descriptions are still "Mars")
- Domain name changed to Workgroup
- Both NICs are present but their names are changed: public -> Ethernet. Private -> Ethernet 2
- IPv4 address becomes DHCP enabled
- IPv6 protocol is checked again despite being unchecked before
- On cloned vm Jupiter, Windows updates are current.


5. If you want to make more clones from Mars, then no need to change anything on it. On Jupiter make the following changes to turn it into a functional vm node.
- IP address for public and private NICs
- Subnet mask or public and private NICs
- Default gateway for public NIC only
- DNS for public NIC only
- computer name
- Join domain

6. Repeat most of the above steps to clone more vms (Saturn, Neptune, Uranus, Nibiru, etc). Since Mars can be reused there's no need to prep for template again. You can start straight from Importing vm. Also newly cloned vm is in off state which makes it easier to distinguish from its source vm (running).

Thursday, July 26, 2018

Collection of errors and tricks for Master Data Service 2017

I've met a few errors recently during setting up SQL Server 2016 & 2017 Master Data Services. Although all have been resolved eventually some of them are quite gotchas, and it's good to document for a record.

#1 error -
Permission error on MDS installation folder. Sometimes it's very strange that you already successfully installed the product but got access denied when checking components. To fix this problem login in under an admin account and grab the folder ownership. Then assign permissions and make sure they are inherited from parent.
 
 
#2 error -
Unable to access MDM (Master Data Manager) web site due to version mismatch. This usually happens when you install SQL Server and MDS asynchronously. For example, I installed SQL Server 2017 RTM with MDS, followed by an upgrade of Cumulative Update 8. Later on I had to uninstall and reinstall MDS from scratch but forgot to apply CU8. This error is straight forward once you open MDS Configuration Manager, it will tell you to upgrade. To do that just hit the "Upgrade Database" button on the right side to let the wizard self finish.


#3 error -
MDM slowness or simply Runtime error. When I assigned group permissions on MDM the web site just hung upon mouse clicks. Meanwhile CPU usage soared to above 50%. I checked IIS Manager and saw MDS app pool was waiting for extended time. If I restarted IIS it got back to normal but with a couple of mouse click the slowness reoccurred. However user activities didn't seem to be affected too much. Eventually the hanging web page would throw a runtime error. See below. The solution - again, what I did to match up versions in #2 fix the slowness as well.


#4 error -
800703fa error. Some say try not to login using MDS service account. But I fixed it by following Microsoft KB article https://blogs.msdn.microsoft.com/dsnotes/2016/03/01/com-intermittent-error-800703fa-illegal-operation-attempted-on-a-registry-key/


#5 error -
MDM web site is online but user got access denied errors. Out of the box MDS does not allow users to access until they are granted functional permissions, i.e. explorer, system admin, integration admin, version control admin, and super user, etc.


#6 error -
Package deployment failed due to folder access problem as in #1. Just add MDS service account to Configuration folder and assign read/write permissions.


Tuesday, February 13, 2018

Error 18456, Level 14, State "N"

In SQL Server 2005 and beyond, a login failure will log in more details under the infamous message number 18456. This error includes various types of states that gives a hint on why a login failure happens. I'm posting a pool of all states that I've collected over the past years. Hopefully answer is found here without going anywhere further.

Error State           Error Description
----------------       ---------------------------------------------------------------------------------------------------------------------
1, 58                    An attempt to login using SQL authentication failed. Security is set up with 
                            Windows authentication only but user is trying to use standard SQL login
2, 5                      Invalid userid (eg. wrong login name or login name does not exist)
6                          Attempt to use a Windows login name with SQL Authentication
7                          Login disabled and password mismatch
8                          Password mismatch (eg. wrong password)
9                          Invalid password
10                        This is a rather complicated variation on state 9; as KB #925744 states, this means
                            that password checking could not be performed because the domain account being
                            used for the SQL Server service is disabled or locked on the domain controller. No
                            reason is given in the verbose message in the error log.
11, 12                  Valid login but server access failure
13                        SQL Server service paused
16                        User does not have permissions to log into the target database, such as drop user
                            from default db, or default db is not online
18                        Change password required
21
23                        The most common one is that connections are being attempted while the service is
                            being shut down. However, if this error occurs and it is not surrounded in the log by
                            messages about SQL Server shutting down, and there is no companion reason along
                            with the message, look at KB #937745, which implies that this could be the result of
                            an overloaded server that can't service any additional logins because of connection
                            pooling issues. Finally, if there *is* a companion reason, it may be the message
                            indicated to the right, indicating that SQL Server was running as a valid domain
                            account and, upon restarting, it can't validate the account because the domain
                            controller is offline or the account is locked or no longer valid. Try changing the
                            service account to LocalSystem until you can sort out the domain issues.
27                        Server could not determine the initial database for the session
28                        Involves overloaded connection pooling and connection resets.
38                        Failed to open the explicitly specified database. the database specified in the client
                            connection does not exist, or is offline.
40                        The login's default database is offline or no longer exists.  Resolve by fixing the
                            missing database, or changing the login's default database using ALTER LOGIN
                            (for older versions, use sp_defaultdb (deprecated)). This is reported as state 16 prior
                            to SQL Server 2008.
56                        Not very common. like states 11 & 12, this could have to do with UAC, or that the
                            domain controller could not be reached. Try changing the service account for SQL
                            Server to a known domain or local account, rather than the built-in local service
                            accounts.
65                        User specified the correct username and contained database, but entered an
                            incorrect password. (Denali)
------------------------------------------------------------------------------------------------------------------------------------------

Please also refer to the following sites for more info:

https://docs.microsoft.com/en-us/sql/relational-databases/errors-events/mssqlserver-18456-database-engine-error
https://sqlblog.org/2011/01/14/troubleshooting-error-18456


Tuesday, January 30, 2018

SQL Version - Let's Go Further Beyond @@version

When DBAs need to check SQL Server edition, version, build or patch level, most of them use @@version to get the info. Too often I found it's insufficient. Let me give you a few examples:

1. @@version does not provide info on cumulative update or other special security patches. For instance, on a system with build no 12.0.5557.0, it only shows SQL Server 2014 SP2, but more accurately it's SP2 cumulative update package 8 (CU8). The CU details sometimes are critical to compare between SQL instances in order to bring them to consistency or t-shoot a problem due to inconsistency.

2. SQL version closely links to Windows version. So it's a common desire to not only find info at SQL Server level but also at an OS level. Before SQL Server 2016 the OS info is vague to say the least. Let's say, on a Windows Server 2012 system, you might find @@version returns "Windows NT 6.2 <x64> (Build 9200)". I hear ya, we all hate that! Fortunately beginning on SQL 2016, they put more welcome message like "Windows Server 2016 Datacenter Evaluation 10.0 <X64> (Build 14393: ) (Hypervisor)" - much better, huh?

3. The built-in function @@version lacks visibility of tracking down the source of a patch, which usually is a Microsoft Knowledge Base article. It also lacks a concise yet detailed enough description of what a patch is targeted for.  For example, build no 13.0.4199 is an important update for SQL Server 2016 SP1 Reporting Service. If you search for the build number you'll find great details from KB3207512.

4. The official release dates. Don't get confused by the build date returned by @@version. The release dates are more important to end users as they can have a broad view of the life cycles of the products they purchase. The dates also help SQL guys determine how far their servers fall behind of current level.

5. An indicator of hardware model, whether a physical server, a virtual machine, or a Hyper-V, is definitely welcome. In addition, any critical info such as SQL Server's processors, memory, min/max target server memory, etc makes a DBA's life easier.

All the above mentioned shortcomings can be fixed when you use this blog post:

http://sqlserverbuilds.blogspot.com/

For the past decade it has been my de facto web site for SQL Server version checking. Just to disclaim that I have no affiliation with the blogger. I have no knowledge who created and is maintaining this site. Whoever did it it's a job well done. It is probably the most complete and detailed list of all SQL Server patches you can find on the web. It covers the release of version 7.0 all the way up to SQL 2017.

How nice would it be if we could combine the merits from this web site with the good stuff returned by @@version? Well, that's why I'm blogging in this post to show you my 90% automated solution. Fortunately the 10% manual work is as easy as a breeze. Here we go.

My testing prerequisites:
- Any SQL versions between 2005 and 2017, with xp_cmdshell enabled
- Excel 2013/2016
- SQL Server Data Tool (Visual Studio 2015)

Step 1.   At your own leisure copy version contents from the blog site into an Excel spreadsheet. To do so first find the beginning line of your interest, such as "Microsoft SQL Server 2017 Builds". Hold down the shift key while highlighting sections. You can scroll the right bar up and down to quickly get to desired spot, e.g. the end of chart for "Microsoft SQL Server 2000 Builds". Copy and paste it to an blank Excel workbook. Save it as "CSV (Comma delimited) file. When prompted if some special info in the Excel needs to be saved, click yes. The file location is C:\Temp\SQLServerBuild.


Step 2.   In the same folder mentioned in Step 1, create two .sql files for header and tail. They will be merged with a body text to form an intact stored procedure.

Header T-SQL:

USE master;
 GO

IF OBJECT_ID ( 'dbo.sp_SQLServerBuildInfo', 'P' ) IS NOT NULL
   BEGIN
     DROP PROCEDURE dbo.sp_SQLServerBuildInfo;
     IF OBJECT_ID('dbo.sp_SQLServerBuildInfo', 'P' ) IS NOT NULL
         PRINT '*** FAILED DROPPING PROCEDURE dbo.sp_SQLServerBuildInfo ***';
     ELSE
         PRINT '*** DROPPED PROCEDURE dbo.sp_SQLServerBuildInfo ****';
   END;
 GO

CREATE PROCEDURE dbo.sp_SQLServerBuildInfo 
AS

-- *********************************************************************************
 -- Procedure Name:  sp_SQLServerBuildInfo
 -- Purpose:         List SQL Server build no, etc for SQL Server 2005 -> 2017
 -- Note:            Refer to this site: http://sqlserverbuilds.blogspot.com/
 -- Author:          Richard Ding
 -- Date Created:    01/28/2018
 -- Date Modified:   
 --**********************************************************************************

 SET NOCOUNT ON;

 IF EXISTS (SELECT * FROM sys.configurations where name = 'xp_cmdshell' and value_in_use = 1)
   BEGIN
     if object_id('tempdb.dbo.#SystemInfo', 'U') is not null
   drop table #SystemInfo
     create table #SystemInfo (ItemValue VARCHAR(5000));
     INSERT INTO #SystemInfo EXEC ('xp_cmdshell ''systeminfo /FO LIST''');
   END
 ELSE
BEGIN
RAISERROR ('Stored procedure sp_SQLServerBuildInfo requries xp_cmdshell to be turn on. Please check.', 16, 1)
RETURN (0);
END;

DECLARE @OSName varchar(100), @OSVersion varchar(100), @SystemManufacturer varchar(60), @SystemModel varchar(60), @Model varchar(100);
 SELECT @OSName = LTRIM(RTRIM(SUBSTRING(ItemValue, CHARINDEX(':', ItemValue)+1, LEN(ItemValue) - CHARINDEX(':', ItemValue))))
                  FROM #SystemInfo WHERE ItemValue LIKE 'OS Name%';
 SELECT @OSVersion = LTRIM(RTRIM(SUBSTRING(ItemValue, CHARINDEX(':', ItemValue)+1, LEN(ItemValue) - CHARINDEX(':', ItemValue))))
                     FROM #SystemInfo WHERE ItemValue LIKE 'OS Version%';
 SELECT @SystemManufacturer = ItemValue FROM #SystemInfo WHERE ItemValue LIKE 'System Manufacturer%';
 SELECT @SystemModel = ItemValue FROM #SystemInfo WHERE ItemValue LIKE 'System Model%';
 SELECT @Model = '(' + LTRIM(RTRIM(SUBSTRING(@SystemManufacturer, CHARINDEX(':', @SystemManufacturer)+1, LEN(@SystemManufacturer) - CHARINDEX(':',
                 @SystemManufacturer)))) + ') ' + LTRIM(RTRIM(SUBSTRING(@SystemModel, CHARINDEX(':', @SystemModel)+1, LEN(@SystemModel) - CHARINDEX(':', @SystemModel))));


IF object_id('tempdb.dbo.#versioninfo', 'U') IS NOT NULL
DROP TABLE #versioninfo
CREATE TABLE #versioninfo ([Index] varchar(5), [Name] varchar(20), Internal_Value varchar(10), Character_Value varchar(120));   
INSERT INTO #versioninfo EXEC ('master.dbo.xp_msver');
   

DECLARE @ProductVersion varchar(50), @cpuspeedcount varchar(3), @Memory varchar(5);
 SELECT @ProductVersion = CONVERT(VARCHAR(50), SERVERPROPERTY('ProductVersion'));
 SET @cpuspeedcount = (SELECT Internal_Value FROM #versioninfo WHERE Name = 'ProcessorCount');
 SET @Memory = (SELECT Internal_Value FROM #versioninfo WHERE Name = 'PhysicalMemory');

 DECLARE @cpuidentifier varchar(100), @CPUNameString varchar(100);

/*  Find CPU Name String such as "Intel(R) Xeon(TM) CPU 1.60GHz"  */
 EXEC master.dbo.xp_regread
   @rootkey='HKEY_LOCAL_MACHINE',
   @key='HARDWARE\DESCRIPTION\system\Centralprocessor\0',
   @value_name='ProcessorNameString',
   @value = @CPUNameString OUTPUT,
   @no_output = 'no_output';

DECLARE @MaxMemory varchar(5), @MinMemory varchar(5)
SELECT @MaxMemory = convert(varchar(5), cast(value_in_use as int)/1024)  FROM sys.configurations where name = 'max server memory (MB)'
SELECT @MinMemory = convert(varchar(5), cast(value_in_use as int)/1024)  FROM sys.configurations where name = 'min server memory (MB)'

--  Big select statement:
 SELECT @OSName as 'Windows OS Edition'
 , @OSVersion AS 'Windows OS Service pack'
 , @Model AS 'Hardware Model'
 , @Memory + ' MB (SQL Min:' + @MinMemory + ' GB - Max:' + @MaxMemory + ' GB)' AS 'Memory'
 , REPLACE(REPLACE(REPLACE(left(LTRIM(@CPUNameString), 50), '    ', ' '), '   ', ' '), '  ', '') +' (x' + @cpuspeedcount + ') ' AS 'Processor'
 , CONVERT(VARCHAR(50), SERVERPROPERTY('ServerName')) AS 'SQL Server Name'
 , CASE
     WHEN @ProductVersion LIKE '8.0%' THEN 'SQL Server 2000'
     WHEN @ProductVersion LIKE '9.0%' THEN 'SQL Server 2005'
     WHEN @ProductVersion LIKE '10.0%' THEN 'SQL Server 2008'
     WHEN @ProductVersion LIKE '10.50%' THEN 'SQL Server 2008 R2'
     WHEN @ProductVersion LIKE '11.0%' THEN 'SQL Server 2012'
     WHEN @ProductVersion LIKE '12.0%' THEN 'SQL Server 2014'    
  WHEN @ProductVersion LIKE '13.0%' THEN 'SQL Server 2016'
WHEN @ProductVersion LIKE '14.0%' THEN 'SQL Server 2017'
   ELSE '' END + ' ' + CONVERT(VARCHAR(50), SERVERPROPERTY('Edition')) as 'SQL Server Edition', 
   CASE
   --  End of header

Tail T-SQL:

--  Begining of tail:
   ELSE '<' + @ProductVersion + '> Unknown' END AS 'SQL Server Build & Product Version'
--  End of tail 

RETURN 0;   
GO

GRANT EXEC ON sp_SQLServerBuildInfo TO public;
GO

Step 3.   Create an Integration Service solution/project in SQL Server Data Tool. Items are described in the order they are created.


(1)  SQL Server Connection Manager Data Source "(local)". Use Windows Authentication to login in local default instance. Select tempdb as target environment.


(2) Flat File Connection Manager Data Source "SQLServerBuilds.csv". Each detailed windows are shown below.


(3) Execute SQL Control Flow Task "Prep temp table". All settings are default. The T-SQL statement is below

USE [tempdb];

if object_id ('tempdb.dbo.SQLServerBuilds', 'U') is not null
drop table [SQLServerBuilds];

CREATE TABLE [dbo].[SQLServerBuilds](
--ID int identity primary key clustered,
[Build] [nvarchar](500) NULL,
[File version] [nvarchar](500) NULL,
[KB / Description] [nvarchar](4000) NULL,
[Release Date] [nvarchar](500) NULL
);


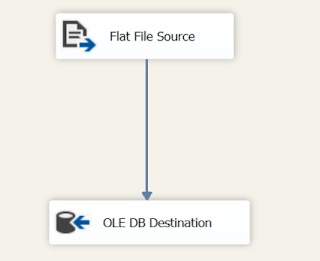
(4) Data Flow Task "Import from CSV". Note not all columns are selected. 


(5) Execute SQL Task Control Flow "Cleaning garbage". Its DML commands are in the following:

UPDATE tempdb.dbo.[SQLServerBuilds] 
SET [KB / Description] = CONCAT([KB / Description], ', ', substring([Release Date], 1, charindex('",', [Release Date])))
WHERE [Release Date] LIKE '%",%'

UPDATE tempdb.dbo.[SQLServerBuilds] 
SET [Release Date] = STUFF ([Release Date], 1, charindex('",', [Release Date]) + 1, '')
WHERE [Release Date] LIKE '%",%'

DELETE FROM tempdb.dbo.[SQLServerBuilds] WHERE Build IS NULL OR LEFT (Build, 1) LIKE '%[A-Z]%'

UPDATE tempdb.dbo.[SQLServerBuilds] 
SET [KB / Description] = STUFF ([KB / Description], 1, 1, '')
WHERE [KB / Description] LIKE '"%'    --  181 rows affected

UPDATE tempdb.dbo.[SQLServerBuilds] 
SET [KB / Description] = STUFF ([KB / Description], 1, 1, '')
WHERE [KB / Description] LIKE '"%'    --  181 rows affected

UPDATE tempdb.dbo.[SQLServerBuilds] 
SET [KB / Description] = STUFF ([KB / Description], LEN([KB / Description]), 1, '')
WHERE [KB / Description] LIKE '%"'    --  181 rows affected

UPDATE tempdb.dbo.[SQLServerBuilds] SET [Release Date] = REPLACE(REPLACE ([release date], '*new"', ''), '"', '')

UPDATE tempdb.dbo.[SQLServerBuilds] SET Build = REPLACE(Build, '.00.', '.0.') where Build like '1[0-2].00.%'    --  251 rows 


(6) Execute SQL Control Flow Task "Create sp_SQLServerBuildInfo". Its DML commands are in the following:

exec master.dbo.xp_cmdshell 'sqlcmd -E -i "C:\Temp\SQLServerBuild\sp_SQLServerBuild.sql"'

(7) Execute SQL Control Flow Task "Combine into sproc". Its DML commands are in the following:

exec master.dbo.xp_cmdshell 'copy C:\Temp\SQLServerBuild\*.sql C:\Temp\SQLServerBuild\sp_SQLServerBuildInfo.sql /y'

(8) Execute SQL Control Flow Task "Generate body syntax". Its DML commands are in the following:

declare @string varchar (8000)
select @string = 'set nocount on select ''WHEN @ProductVersion LIKE '''''' + Build + ''%'''' THEN ''''<'''' + @ProductVersion + ''''> '' + replace([KB / Description], '''''''', '''''''''''') +  '' ('' + ISNULL([Release Date], '''') +  '')'''''' from tempdb.dbo.[SQLServerBuilds] order by [File version] asc'
select @string = 'sqlcmd -E -d tempdb -Q "' + @string + '" -o "C:\Temp\SQLServerBuild\2. body.sql"'
print @string
exec master.dbo.xp_cmdshell @string

(9) Execute the whole package (may need to execute the first control flow task separately to resolve object reference). Check the result file at C:\Temp\SQLServerBuild\sp_SQLServerBuildInfo.sql. The body part contains about 1000 lines of code so I won't list it here. Below i compared the results of sp_SQLServerBuildInfo and @@version just to see the fine differences.