Step 1. Download SQL Server 2017 RTM Developer Edition from https://www.microsoft.com/en-us/sql-server/sql-server-downloads. Run setup.exe from installation media. Click on the link in SQL Server Installation Center that says "New SQL Server failover cluster installation". Leave the box unchecked for "use MSFT update to check for updates" option. We want to do rolling upgrade of CU1 later on. Click on Next to install global rules, add setup files and install Failover Cluster Rules. Accept license and Developer Edition. In Feature Selection pane only choose Database Engine Services and client connectivity. choose default instance and installation path.
Step 2. Type in SQL Server Network Name. Leave default instance unchanged.
Step 3. Click Next to go to Cluster Resource Group page. Under default group name "SQL Server (MSSQLSERVER)" There're two items with red alarms. Do not panic! it simply tells you there're two WSFC reserved resource groups therefore you cannot use them for SQL Server group.
Step 4. Click Next to move on to Cluster Disk Selection page. You can check or uncheck disks for the SQL Server resource group. We check all disks in the list. Also note there's one red alarm down in the page that points out that the quorum disk cannot be used for SQL resource group.
Step 5. Next type in a static IP address for the virtual SQL Server name.
Step 6. In the following step we'll provide the service accounts. In this case I use Administrator for ease of installation. But in real world you need to follow security best practice of lease privileges. Make sure both SQL Server and Agent services are in Manual startup state.
Step 7. Next we will configure directory paths for data root, system db, user db data and log, backup and tempdb.
Step 8. Continue with installation until completion.
Step 9. Notice SQL Server installation cannot be done in parallel on all available nodes. We have to set it up one by one on each remaining nodes. So log on node B to launch SQL Server setup.exe. Choose the link "Add node to a SQL Server failover cluster" from the Installation pane (See screenshot in Step 1). Most of the processes are identical to the ones when initially creating a SQL failover cluster. The first different screen is "Cluster Node Configuration" page instead of "Instance Configuration" page. Here we're adding node B to existing node A.
Step 10. Make sure the IP address of SQL Server network name is correct.
Step 11. Follow installation as previously described. Now we've completed node B installation. Just repeat the same steps for adding node C to the cluster.
Step 12. Let's verify our SQL Server Failover Cluster.
- From WSFC level we see in the Summary page we know there're three nodes set up. Current Host Server is Node B as the quorum disk is owned by B.
- On Roles Summary page, we confirm SQL Server Service is up and running on Node A.
- On the Roles Resources tab we also confirm that all shared disks are online and owned by Node A. That's where the SQL Server service is running from.
- Select on Nodes in left pane in FCM, the summary of all three nodes are displayed in the right pane. Each node is up and running and serves as one vote.
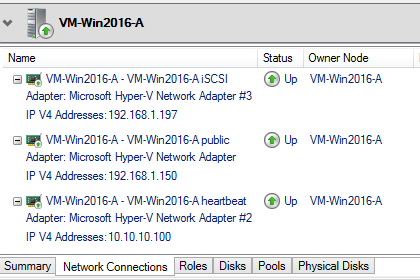
- Switch to the second tab of "Network Connections" we see three networks (iSCSI, public, and heartbeat) for each node.
- Next tab is Roles which shows SQL Server as a role is up and running.
- The last meaningful tab for the Nodes is Disks. We can confirm all shared disks (D:, L:, B:, G:) are online and owned by Node A.
- If you click on "Disks" in FCM object pane, it's contents are expanded in the detailed Summary window.
- For Networks check highlight Cluster Network 1 (public and iSCSI) and Cluster Network 2 (Heartbeat) respectively. Their contents are structured by nodes and NICs on the Network Connections tab.
- The last thing to check is Cluster Events. There's no errors logged in the Events pane. The FCM summary pane also shows "Recent Cluster Events: None in the last hour".
- At the end we'd like to connect to the SQL Server through SSMS to run a T-SQL query. First of all we can successfully connect to the SQL Server Network Name, also known as VNN (Virtual Network Name). Secondly, using a couple of methods we can report on the current node name with consistency.


No comments:
Post a Comment