Tuesday, November 28, 2017

Upgrade SSRS 2008 to 2016

Today I successfully migrated a native mode Report Server from version 2008 to 2016. It is supported per MSFT Books Online.


It was a side-by-side upgrade. On the new VM SQL Server 2016 SP1+CU5 was installed first. The database engine and report service are components installed. ReportServer database was created locally. Encryption key was backed up. There're a few options to get the upgrade done. I did try two of them.

Option # 1. Restore ReportSserver database
Restoring ReportServer database sounds the simplest way of restoring all report server contents in a quick way. Before you do this backup the reportserver db on both source and target servers. Also generate and backup the encryption keys on both servers. Restoring the database is straight forward. Getting the new Report Service up and running is also a breeze. Restoring the original encryption key is also successful. But the web portal wouldn't function and displayed an error message:

The version of the report server database is either in a format that is not valid, or it cannot be read. The found version is '143'. The expected version is '175'. (rsinvalidReportServerDatabase)

So I messed around with two tables in the ReportServer database - ServerUpgradeHistory and DBUpgradeHistory. The former shows one record with ServerVersion = 143. The latter contains a list of upgrade from DbVersion 143 all the way up to 175. Either updating the values from 143 to 175 or adding a second value of 143 didn't help. ReportServerService log looked ok. It's the ReportingServices.Portal.WebHost log that showed a weird error:


I did a search for object "GetAllFavoriteItems" in all SQL builds to no avail. I googled it but surprisingly i found no hit at all. Anyone knows anything about this stored procedure please do drop me a line.

Option # 2. Use SSDT to upgrade rdls
Since I needed to upgrade the report server project from SSRS 2008 BIDS to SSRS 2016 SSDT I took this approach. It was also very straight forward. In the SSDT environment I added all report rdls by dragging and dropping them to the solution explorer pane. I then went through each report definition to straighten out data source and data set. Saved them all followed by a deployment. The transition was smooth and transparent.

Option # 3. Use rss utility to copy report items
Using the built-in rss utility to copy rdls, data sources, datasets, etc is a viable solution. Had method 2# not worked out I would have dived into this remedy.

Option # 4. Use Third party deployment/upgrade tools
Never looked into this but I believe there're some tools out there for this purpose.  


Series 6 - Adding MSDTC as A Cluster Role

For SQL Server distributed transactions we need to add DTC as a separate resource group in the failover cluster. Here are the brief steps:

Step 1.   In StarWind Free SAN Management Console create a dedicated LUN for the MSDTC resource. It requires 500 MB to 1 GB. Use thick client as previously described in quorum disk creation.


Step 2.   Present the new LUN to host. Open Windows Disk Manager a message pops up asking you to initialize the disk.


Step 3.   After clicking OK the disk is online showing unallocated 1023 MB. Right click on it and choose to create a new simple volume. Assign a free drive letter to it, format it with NTFS, choose allocation unit size = 64 KB, and create a label "MSDTC". Click Quick format and Finish.


Step 4.   In FCM we want to add the available shared disk to storage. Right click on Disks and choose Add Disk.


Step 5.   The disk is already checked in the Available disks list. Click OK. Now cluster disk #6 has been added to the list.


Step 6.   In FCM right click on Roles then Configure Roles -> On the High Availability Wizard page click Next


Step 7.   In Select Role windows choose "Distributed Transaction Coordinator (DTC). Click Next.


Step 8.   In Client Access Point page provide Network Name for DTC and an IP address.


Step 9.   In the next window check the new disk as the storage.


Step 10.   Review the confirmation page and click next. Wizard will complete successfully.


Step 11.   Click on Roles we now see MSDTC as a separate role.


Monday, November 20, 2017

Series 5 - Cluster-Aware Updating (CAU)


CAU allows patching Windows cluster nodes with minimum downtime. Below is a self-updating process.


Step 1.   You can get to CAU in both ways:
In FCM right click on the Windows cluster name -> More Action -> Cluster Aware Updating
or In Server Manager -> Tools -> Cluster-Aware Updating

Step 2.   Select the Windows cluster name to connect -> Click Connect -> Configure cluster self-updating options. This step creates CAU role.


Step 3.   Read the details in the wizard.


Step 4.   Add the CAU role by checking the box as shown in the diagram.


Step 5.   Specify a schedule to update. For ease we create a daily schedule at midnight.


Step 6.   In Advanced Options take default values


Step 7.   Check recommendations on updates


Step 8.   Review confirmation summary page before the run


Step 9.   Now CAU role has been successfully created


Step 10.   Before we kick off auto updating, it's recommended to run a readiness test. In the CAU window click on the link in the right pane that says "Analyze cluster updating readiness". Our test went through with only one warning. Since we're not using proxy servers let's safely ignore it.


Step 11.   Also click on "Preview updates for this cluster" to see what updates are going to be applied. We can see all three nodes need a new virus definition file for Windows Defender. Node A requires a Cumulative Update as well.


Step 12.   At our scheduled time the auto updates kicks off.


Step 13.   One hour later there was a failover happening and node A was rebooted.


Step 14.   Finally all three nodes are updated successfully. 


Step 15.   You can click "Generate report on past Updating Runs" to display a report with updating details.


Friday, November 17, 2017

Server Manager crashing - fixed!

All of a sudden Server Manager stopped working on my Windows 2016 Servers. When I launched SM it displays the dashboard that appeared to search some information, then a box popped up. See below. There has been no windows updates within a week. And it was working fine yesterday.


Checking Windows Application Log showed this error message:

Faulting application name: ServerManager.exe, version: 10.0.14393.1737, time stamp: 0x59bafc80
Faulting module name: KERNELBASE.dll, version: 10.0.14393.1770, time stamp: 0x59bf2ba6
Exception code: 0xe0434352
Fault offset: 0x0000000000033c58
Faulting process id: 0x334
Faulting application start time: 0x01d35fdfbfc29a54
Faulting application path: C:\Windows\system32\ServerManager.exe
Faulting module path: C:\Windows\System32\KERNELBASE.dll
Report Id: 7f16cc8e-5221-4f10-9ed8-3f9de97760f8
Faulting package full name:
Faulting package-relative application ID:

I first attempted to fix the problem by renaming registry key

\HKEY_LOCAL_MACHINE\SOFTWARE\Microsoft\ServerManager\ServicingStorage\ServerComponentCache
to \HKEY_LOCAL_MACHINE\SOFTWARE\Microsoft\ServerManager\ServicingStorage\ServerComponentCacheOLD

Upon a server reboot the key was recreated. And I was able to launch SM normally on one of the servers just for one time. The other two server still experienced the same error despite of registry changes. The working server again threw the SM error upon a second try.


I then checked the server role and features I installed lately. I found alongside the MPIO feature I wanted to install for clustering, I accidentally chose Multipath Connector at the same time. So using the registry trick I gained access to SM. Under Manage -> uninstall roles and features I quickly removed Multipath Connector for all servers. After rebooting, all are working fine now!


Thursday, November 16, 2017

Series 3 - Build a 3-node Windows Server 2016 Failover Cluster

This chapter focuses on building Windows failover cluster (WSFC). Some prerequisites need to be checked first.

- OS patches are identical among all nodes (use gpedit.msc to disable auto update)
- Drive letters are consistent among all nodes
- Installed features and .Net Framework versions remain identical on all servers
-

Steps are outlined below:

1.   To find out if our nodes are ready or not for clustering, run a "Validate Configuration" task from FCM on the node that currently owns all shared disks. Basically you need to type in the node names separated with a comma. Add them to the selected server list. Click on Next to move to Testing Options window. We should run all tests as recommended. But we often just run a subset of it to test if one particular target is passed. Check the validation result report carefully. We don't want to rush to building a failover cluster unless all tests are passed.


2.   We have compared the warning message about missing software updates on all nodes. We're sure the possible minor difference will not cause cluster functionality.


3.   We started out by building a two node cluster. We will add the third node to it by joining. In FCM click on "Create Cluster" in the right middle pane. This launches Create Cluster Wizard.


4.   Type in cluster name "ParadiseWSFC" and IP address 192.168.1.22


5.   Verify the confirmation page. Also check adding eligible disks to the cluster.


6.   You can confirm the Cluster Network Object (CNO) has been created in AD DS. The DNS entry is also created.


7.   After the cluster is created, it shows up as online in Server Manager. And you can connect to the cluster in FCM.


8. Now let's add a third node to the cluster. To do this click on the 'Add Node...." link in Configure pane in FCM. Manually type in the third node name the same way you start to create the cluster.


9.   Let the wizard complete.


10.   Verify there're three nodes up and running in FCM.


Series 4 - Build a SQL Server 2017 Cluster

In this Episode we're going to build SQL Server 2017 Failover Cluster on the WSFC created in Series 3. As of today the most current release for SQL Server 2017 RTM is CU1, build no. 14.0.3006.16

Step 1.   Download SQL Server 2017 RTM Developer Edition from https://www.microsoft.com/en-us/sql-server/sql-server-downloads. Run setup.exe from installation media. Click on the link in SQL Server Installation Center that says "New SQL Server failover cluster installation". Leave the box unchecked for "use MSFT update to check for updates" option. We want to do rolling upgrade of CU1 later on. Click on Next to install global rules, add setup files and install Failover Cluster Rules. Accept license and Developer Edition. In Feature Selection pane only choose Database Engine Services and client connectivity. choose default instance and installation path.


Step 2.   Type in SQL Server Network Name. Leave default instance unchanged.


Step 3.   Click Next to go to Cluster Resource Group page. Under default group name "SQL Server (MSSQLSERVER)" There're two items with red alarms. Do not panic! it simply tells you there're two WSFC reserved resource groups therefore you cannot use them for SQL Server group.


Step 4.   Click Next to move on to Cluster Disk Selection page. You can check or uncheck disks for the SQL Server resource group. We check all disks in the list. Also note there's one red alarm down in the page that points out that the quorum disk cannot be used for SQL resource group.


Step 5.   Next type in a static IP address for the virtual SQL Server name.


Step 6.   In the following step we'll provide the service accounts. In this case I use Administrator for ease of installation. But in real world you need to follow security best practice of lease privileges. Make sure both SQL Server and Agent services are in Manual startup state.


Step 7.   Next we will configure directory paths for data root, system db, user db data and log, backup and tempdb.


Step 8.   Continue with installation until completion.


Step 9.   Notice SQL Server installation cannot be done in parallel on all available nodes. We have to set it up one by one on each remaining nodes. So log on node B to launch SQL Server setup.exe. Choose the link "Add node to a SQL Server failover cluster" from the Installation pane (See screenshot in Step 1). Most of the processes are identical to the ones when initially creating a SQL failover cluster. The first different screen is "Cluster Node Configuration" page instead of "Instance Configuration" page. Here we're adding node B to existing node A.


Step 10.   Make sure the IP address of SQL Server network name is correct.


Step 11.   Follow installation as previously described. Now we've completed node B installation. Just repeat the same steps for adding node C to the cluster.


Step 12.   Let's verify our SQL Server Failover Cluster.
  • From WSFC level we see in the Summary page we know there're three nodes set up. Current Host Server is Node B as the quorum disk is owned by B. 
  • On Roles Summary page, we confirm SQL Server Service is up and running on Node A.  
  • On the Roles Resources tab we also confirm that all shared disks are online and owned by Node A. That's where the SQL Server service is running from. 
  • Select on Nodes in left pane in FCM, the summary of all three nodes are displayed in the right pane. Each node is up and running and serves as one vote.
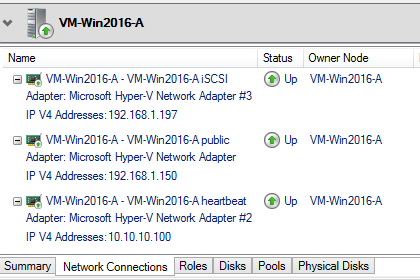
  • Switch to the second tab of "Network Connections" we see three networks (iSCSI, public, and heartbeat) for each node.
  • Next tab is Roles which shows SQL Server as a role is up and running.
  • The last meaningful tab for the Nodes is Disks. We can confirm all shared disks (D:, L:, B:, G:) are online and owned by Node A.  
  • If you click on "Disks" in FCM object pane, it's contents are expanded in the detailed Summary window. 
  •  For Networks check highlight Cluster Network 1 (public and iSCSI) and Cluster Network 2 (Heartbeat) respectively. Their contents are structured by nodes and NICs on the Network Connections tab. 

  • The last thing to check is Cluster Events. There's no errors logged in the Events pane. The FCM summary pane also shows "Recent Cluster Events: None in the last hour".
  • At the end we'd like to connect to the SQL Server through SSMS to run a T-SQL query. First of all we can successfully connect to the SQL Server Network Name, also known as VNN (Virtual Network Name). Secondly, using a couple of methods we can report on the current node name with consistency.