Step 1. Install and configure PolyBase
First of all, we have to install PolyBase. It is a feature that can be checked during SQL Server installation.
Make sure you install Java Runtime Environment (JRE 7 or above) in advance or your PolyBase installation will fail. JRE is needed to connect to Hadoop. In SQL Server 2019 RC1 the prerequisite of JRE has been removed. Instead you're taken to a page that downloads and install JRE 11.
After SQL Server gets installed go into a query session and run the following commands:
EXEC sp_configure 'show advanced option', '1';
RECONFIGURE;
GO
EXEC sp_configure 'hadoop connectivity', 4;
GO
Note you must restart SQL Server service in order for the above configuration to take effect (run value turns from 1 into 4). You can confirm PolyBase is installed by executing the select query below. It should return 1.
select SERVERPROPERTY ('IsPolyBaseInstalled')
Step 2. Download and import source file
We wish to use unstructured non-relational data source. In searching for free samples of comma delimited csv files I stumbled upon this web site http://eforexcel.com/wp/downloads-18-sample-csv-files-data-sets-for-testing-sales/
It seems 1 million records is suitable for our demo. So go ahead downloading that file highlighted in yellow circle.
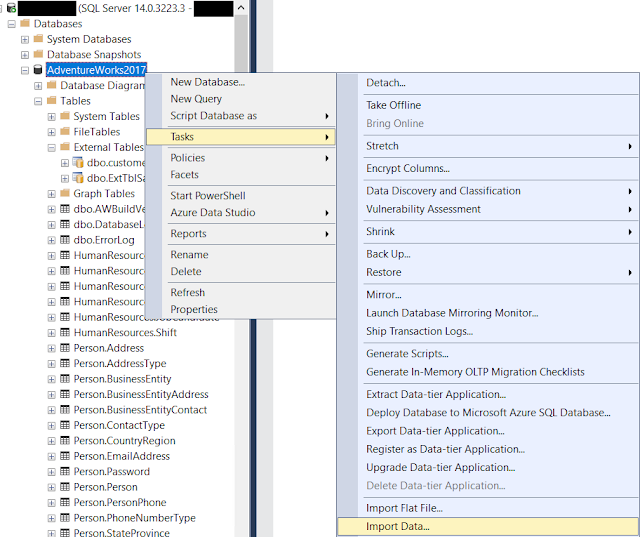
In SSMS, connect to your SQL 2017 server. You can use any database. I happen to have a restored copy of AdventureWorks2017 so let's import the downloaded CSV file into table named "1000000 Sales Records". Make sure data source is flat file and tick the file types to include .csv files. Check columns and preview to make sure the result looks OK.
Step 3. Store CSV file in Azure container
Login in Microsoft Azure Portal. Create a storage account by following this order:
Storage -> Storage Accounts -> New storage Account "polybasestoragesqlshack" -> Blob Containers -> mycontainer01
When the container is ready, click on Upload button to transfer the csv file to cloud.
Step 4. Configure PolyBase query
Follow the steps below to set up PolyBase. Note the password is shown as pound signs for obvious reason. Replace it with your own password.
USE AdventureWorks2017
GO
CREATE MASTER KEY ENCRYPTION BY PASSWORD='########';
GO
CREATE DATABASE SCOPED CREDENTIAL mycredential
WITH IDENTITY = 'credential', Secret = 'YMmkZJR2P4XwmIUhElJeZ88SpYaI3l/LR6BE7vbbPoyREvMYYHb5ioisNu6SXh1BeUbF1KJKuvlPc/RCfGbQYw=='
GO
Portal: Click on storage account access keys, then copy the values from Key1.
MASE (Microsoft Azure Storage Explorer): Click on storage account properties, then copy the values of Primary Key.
CREATE EXTERNAL DATA SOURCE mycustomers
WITH (
TYPE = HADOOP,
LOCATION = 'wasbs://mycontainer01@polybasestoragesqlshack.blob.core.windows.net/',
CREDENTIAL = mycredential
);
CREATE EXTERNAL FILE FORMAT csvformat
WITH (
FORMAT_TYPE = DELIMITEDTEXT,
FORMAT_OPTIONS (
FIELD_TERMINATOR = ','
)
);
CREATE EXTERNAL TABLE ExtTblSalesRecords (
Region varchar(2000),
Country varchar(2000),
[Item Type] varchar(2000),
[Sales Channel] varchar(2000),
[Order Priority] varchar(2000),
[Order Date] nvarchar(100),
[Order ID] nvarchar(100),
[Ship Date] nvarchar(100),
[Units Sold] nvarchar(100),
[Unit Price] nvarchar(100),
[Unit Cost] nvarchar(100),
[Total Revenue] nvarchar(100),
[Total Cost] nvarchar(100),
[Total Profit] nvarchar(100) )
WITH (
LOCATION = '/1000000 Sales Records.csv', -- file is in the root
DATA_SOURCE = mycustomers,
FILE_FORMAT = csvformat)
Finally we can run a query that brings local SQL table and Azure Blob data table together. The below record set is consisted of 5 rows of sales orders from Asia (Azure Blob) and 10 rows of sales orders from other non-Asia regions (on-premise).
SELECT TOP 5 *
FROM [AdventureWorks2017].[dbo].[ExtTblSalesRecords]
WHERE Region IN ('Asia')
UNION
SELECT TOP 10 * FROM [AdventureWorks2017].[dbo].[1000000 Sales Records]
WHERE Region NOT IN ('Asia')


